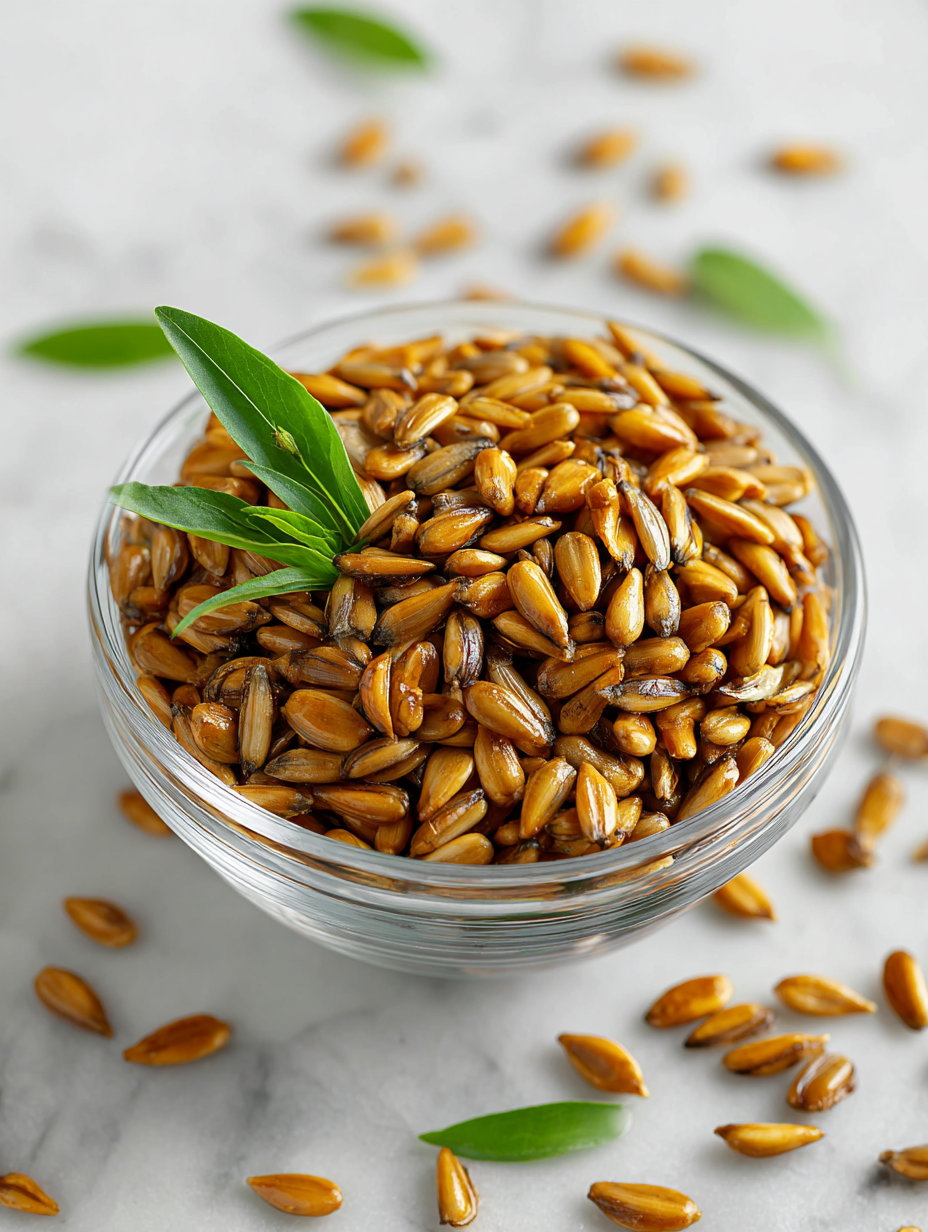
Roasting sunflower seeds might seem like a small act, but it unlocks a whole new world of flavor. The heat draws out their nutty essence, turning what’s often just a casual snack into something deeply aromatic and crave-worthy. I love how simple this process is—just a handful of seeds, a hot oven, and a little patience.
What’s special about roasting them yourself is the ability to customize. Want a smoky touch? Add a pinch of smoked paprika. Prefer a hint of sweetness? A sprinkle of cinnamon and sugar works wonders. It’s those little tweaks that make this recipe a blank canvas for your mood or occasion. Plus, it’s perfect for tossing into salads, yogurt, or just grabbing by the handful.
This recipe is about more than just flavor—it’s about reclaiming a humble ingredient and making it feel special again. Nothing beats the smell of toasted seeds filling the kitchen, that warm, toasted aroma that hints at comfort and simplicity. It’s a small ritual that makes a big difference in how you enjoy a snack or add crunch to your day.
Focusing on how roasting enhances sunflower seeds’ natural nuttiness, transforming a simple snack into a deeply aromatic and customizable treat, perfect for sharing around a cozy table or keeping in your pocket for a burst of flavor anytime.
The story behind this recipe
- I remember the first time I roasted sunflower seeds in my tiny apartment kitchen. The smell of warm seeds filling the air took me back to childhood afternoons at my grandma’s house, where she’d always have a bowl of toasted seeds on the table. That nostalgic scent makes me smile every time I roast a batch now.
- One rainy weekend, I decided to experiment with roasting seeds with just a sprinkle of sea salt and a dash of smoked paprika. The simple act of toasting transformed these humble seeds into a snack that’s both comforting and a little bit special. It’s become a go-to for when I need a quick, savory pick-me-up.
- Over the years, I’ve played around with flavorings—cinnamon sugar for a sweet twist, chili powder for heat—but I always come back to the pure roasted seed. It’s honest, straightforward, and reminds me that sometimes, simple ingredients shine brightest when given a little heat and patience.
Key Ingredients and Tips
- Sunflower seeds: I love how their mild nuttiness develops during roasting; if you prefer a crunchier texture, extend roasting time slightly.
- Salt: Just a pinch enhances flavor without overpowering; feel free to skip if you’re watching your sodium intake, but expect a flatter taste.
- Olive oil: A light drizzle helps seeds toast evenly and adds a subtle shine; for a lower-fat option, skip the oil and keep a close eye on the seeds during roasting.
- Smoked paprika: Adds a smoky depth that lingers; if you don’t have it, a dash of cumin or chili powder can add warmth without the smoky note.
- Sugar or honey (optional): For a touch of sweetness, I sometimes toss seeds with a sprinkle of sugar before roasting; if you prefer savory, skip this step entirely.
- Lemon zest (optional): Brightens the flavor profile with a zing that cuts through the nuttiness; skip if you want a more straightforward roasted seed.
- Additional spices: Cumin, garlic powder, or cayenne can elevate the flavor—start with small amounts and adjust to taste.
Spotlight on key ingredients
Sunflower seeds:
- I love how their mild nuttiness develops during roasting; if you prefer a crunchier texture, extend roasting time slightly.
- Salt: Just a pinch enhances flavor without overpowering; feel free to skip if you’re watching your sodium intake, but expect a flatter taste.
- Olive oil: A light drizzle helps seeds toast evenly and adds a subtle shine; for a lower-fat option, skip the oil and keep a close eye on the seeds during roasting.
Spices and flavorings:
- Smoked paprika: Adds a smoky depth that lingers; if you don’t have it, a dash of cumin or chili powder can add warmth without the smoky note.
- Sugar or honey (optional): For a touch of sweetness, I sometimes toss seeds with a sprinkle of sugar before roasting; if you prefer savory, skip this step entirely.
- Lemon zest (optional): Brightens the flavor profile with a zing that cuts through the nuttiness; skip if you want a more straightforward roasted seed.
Notes for ingredient swaps
- Dairy-Free: Olive oil works perfectly, but if you want a richer flavor, try coconut oil. It adds a subtle sweetness and a hint of tropical aroma.
- Salt: Sea salt is classic, but for a different crunch and mineral note, try flaky kosher salt or smoked sea salt. Just reduce the amount a bit if flaky.
- Sweeteners: Honey or maple syrup can be used instead of sugar for a sticky, caramelized finish. Go easy, so seeds don’t clump or burn.
- Spices: Smoked paprika is ideal, but cumin or chili powder can add warmth and smokiness if you’re out. Use in small amounts to avoid overpowering.
- Add-ins: A sprinkle of cinnamon or nutmeg can turn these into a sweet snack—skip if you’re after pure nuttiness. They’ll give a cozy aroma.
- Oil alternatives: For a lighter version, skip the oil altogether, but keep an eye on the seeds—they might roast unevenly without it.
- Vinegar: A splash of apple cider vinegar before roasting can add brightness and tang, balancing the nuttiness with a zing. Just don’t go overboard.
Equipment & Tools
- Baking sheet: To hold the seeds for even roasting.
- Mixing bowl: To toss seeds with oil and seasonings.
- Spatula: To stir and turn seeds during roasting.
- Oven: To provide consistent heat for roasting.
Step-by-step roasting guide
- Gather your equipment: a baking sheet, a mixing bowl, and a spatula. Preheat your oven to 180°C (350°F).
- In a mixing bowl, toss 2 cups of sunflower seeds with 1 tablespoon of olive oil and ½ teaspoon of salt. Mix well until seeds are evenly coated.
- Spread the seeds in a single layer on the baking sheet. Avoid overcrowding to ensure even roasting.
- Place the tray in the oven. Roast for 10 minutes. Keep an eye on them to prevent burning.
- After 10 minutes, stir the seeds gently with a spatula. Continue roasting for another 5–7 minutes, or until seeds are golden and aromatic.
- Check for doneness: the seeds should be crispy, with a rich toasted aroma. If they look pale, roast a little longer, but watch closely.
- Remove from oven. Let the seeds rest on the baking sheet for 5 minutes to cool and finish crisping up.
- Transfer to a bowl or plate. Taste for salt and adjust if needed. Serve warm or store once cooled.
Let the seeds cool slightly before serving or storing. Store in an airtight container for up to a week. Serve as a snack, salad topping, or mix into trail mix.
How to Know It’s Done
- Color: Seeds turn golden brown, not burnt.
- Smell: Toasted, nutty aroma fills the kitchen.
- Texture: Seeds are crispy and crackle when bitten.
Homemade Roasted Sunflower Seeds
Ingredients
Equipment
Method
- Preheat your oven to 180°C (350°F) and line your baking sheet with parchment paper for easy cleanup.
- In a mixing bowl, toss the sunflower seeds with olive oil, salt, and smoked paprika until they are evenly coated. The seeds should glisten slightly and be well seasoned.
- Spread the seasoned seeds in a single, even layer on the prepared baking sheet. Make sure they aren’t piled up to promote uniform roasting.
- Place the tray in the oven and roast for about 10 minutes. The seeds will start to smell nutty and become fragrant as they toast.
- After 10 minutes, carefully remove the tray and give the seeds a gentle stir with a spatula. This helps them toast evenly and prevents burning.
- Return the tray to the oven and roast for another 5 to 7 minutes, or until the seeds are golden brown and aromatic. Keep a close eye to avoid over-browning.
- Once toasted, remove the seeds from the oven and let them cool on the baking sheet for about 5 minutes. They will become crispier as they cool.
- Transfer the cooled seeds to a bowl or jar. Taste and adjust the salt or spices if needed, then enjoy the crunchy, aromatic snack.
Notes
Pro tips for perfect roasted seeds
- Use a hot oven—preheat thoroughly to 180°C (350°F)—to get an even roast.
- Spread seeds in a single layer—crowding leads to uneven cooking and soggy bits.
- Stir halfway—this ensures all seeds toast uniformly and avoid burnt spots.
- Keep a close eye after 10 minutes—seeds can go from perfect to burnt quickly.
- Cool on the tray—rest for 5 minutes to let the seeds crisp up fully before eating.
- Add spices after roasting—if using ground seasonings, sprinkle once seeds are cool for maximum flavor.
- Store in an airtight container—keeps seeds fresh and crunchy for up to a week.
Common mistakes and how to fix them
- FORGOT to preheat oven → Always heat oven before roasting seeds.
- DUMPED seeds on cold pan → Spread seeds in a single layer for even roasting.
- OVER-TOASTED seeds → Watch closely after 10 minutes to prevent burning.
- MISSED stirring during roasting → Stir halfway for uniform color and crunch.
Quick fixes and pantry swaps
- When seeds stick together, splash a bit more oil and toss again.
- If seeds are burnt, quickly transfer to a paper towel to stop cooking.
- DUMPED too much salt? Rinse seeds lightly and dry before roasting again.
- Over-torched seeds? Patch with a squeeze of lemon to cut bitterness and add brightness.
- Splash with water and re-roast if seeds seem dried out or dull in flavor.
Prep, store, and reheat tips
- You can roast the seeds a day ahead; store in an airtight container to preserve freshness and crunch.
- Keep cooled seeds at room temperature for up to a week, or refrigerate for longer shelf life without loss of flavor.
- Reheat briefly in a 150°C (300°F) oven for 3–5 minutes if you want them warm and crispy again—look for a shimmer of oil and a crackle.
- Flavor remains pretty stable over time, but seeds may lose some of their initial aroma and become slightly softer if stored too long.
Top questions about roasted sunflower seeds
1. How do I choose good sunflower seeds?
Look for seeds that are plump, shiny, and free of mold or tears. Fresh seeds will smell nutty and slightly sweet.
2. How do I roast sunflower seeds properly?
Preheat your oven to 180°C (350°F). Toss seeds with oil and salt, spread in a single layer, and roast for about 15 minutes, stirring halfway.
3. How do I know when roasted sunflower seeds are ready?
Seeds are done when they turn golden brown, smell toasted, and crackle when you bite into them. They should be crispy overall.
4. How should I store roasted sunflower seeds?
Store cooled seeds in an airtight container at room temperature for up to a week, or in the fridge for longer freshness.
5. Can I flavor sunflower seeds before roasting?
Yes, you can add spices like smoked paprika, chili powder, or cinnamon before roasting for extra flavor. Just toss seeds with the spices first.
6. What if my seeds burn during roasting?
If seeds burn quickly, reduce oven temperature slightly, stir more often, or roast for a shorter time. Keep an eye after 10 minutes.
7. Should I use oil when roasting sunflower seeds?
Using a light coating of oil helps seeds toast evenly and enhances flavor. Skip the oil if you prefer a lower-fat snack, but watch for uneven roasting.
8. Can I make roasted sunflower seeds without salt?
Yes, adding a pinch of salt enhances flavor, but you can skip or use flavored salts for variety. Experiment with herbs or spices for different tastes.
9. How do I reheat roasted sunflower seeds?
To reheat, warm seeds in a 150°C (300°F) oven for 3–5 minutes until they shimmer slightly and crackle again.
10. Can I make sweet roasted sunflower seeds?
Yes, you can add sweeteners like honey or maple syrup before roasting for a caramelized finish. Be cautious not to burn the sugar.
Roasted sunflower seeds are a simple snack that packs a punch of flavor and nostalgia. The warm aroma filling your kitchen makes it hard to resist grabbing another handful. It’s a humble act of turning everyday ingredients into something a little more special.
Whenever I roast seeds, I remember lazy afternoons and the quiet joy of a crunchy, smoky treat. Sharing them with friends or just enjoying them solo feels grounding in a busy world. Sometimes, it’s the little rituals that bring the most comfort.

Hi, I’m Lily Hayes, the cook, writer, and heart behind Loving This Process. This blog is built on a simple idea that food is not just about the final dish, but about everything that happens while you’re making it. The thinking, the tasting, the adjusting, the learning, and the quiet moments in between. Food has been a constant presence in my life, not as something flashy or perfect, but as something deeply grounding. Cooking has always felt like a process worth savoring, even when it’s messy, slow, or imperfect.
Leave a Reply