Roasting almonds might seem straightforward, but there’s an art to coaxing out their smoky, nutty depth. It’s a simple step that transforms everyday nuts into something more complex, almost mesmerizing to watch and smell. I’ve always loved how a handful of roasted almonds can elevate a snack or add a crunchy twist to salads and desserts.
This recipe isn’t about perfection or fancy techniques—just patience and a watchful eye. The real magic happens when you listen for that faint crackle and smell the warm, toasted aroma. It’s about appreciating the small, honest process of turning raw almonds into something deeply flavorful, with a rustic, imperfect charm.
And honestly, once you get the hang of it, roasting almonds becomes a bit of a meditation. The simple act grounds me in the kitchen, turning a humble ingredient into a small, smoky wonder. It’s a reminder that good things often come from straightforward, honest cooking.
Focusing on the overlooked art of roasting almonds to unlock their hidden smoky depth, transforming everyday nuts into a snack that’s both simple and mesmerizing.
The story behind this recipe
- One quiet afternoon, I found myself staring at a small bowl of raw almonds. I remembered how a simple roast transformed their flavor into something deeply smoky and inviting. That moment made me realize how often overlooked the roasting process is, despite its power to unlock hidden depths.
- I started experimenting, trying different temperatures and times, chasing that perfect balance of crunch and flavor. Each batch felt like a small discovery—sometimes nutty and sweet, other times smoky and complex. It’s become my go-to way to elevate a basic snack or add a rustic touch to salads and desserts.
- heading
- story_type
Ingredient breakdown
- Raw almonds: I love the natural, slightly sweet aroma they give off before roasting. For a deeper flavor, try slightly soaking them first, then drying thoroughly before roasting—adds a subtle nuttiness.
- Salt: A pinch of salt enhances the roasted almond’s smoky depth. I prefer flaky sea salt because it melts nicely, but kosher salt works well if you want a cleaner, less salty crunch.
- Oil (optional): Just a tiny drizzle of neutral oil helps distribute heat evenly and boosts crunch. If you’re avoiding oil, don’t worry—the dry roast will still bring out their flavor, just a tad less glossy.
- Sweet spices (like cinnamon or smoked paprika): I often sprinkle a little after roasting for a warm, smoky layer. Keep it light; too much can overpower that natural almond aroma. Use as a finishing touch.
- Sugar (optional): A light dusting during the last few minutes adds a caramelized crunch. I prefer raw sugar for its rustic shimmer, but fine white sugar works if you want a more polished look.
- Herbs or zest: Toss in a little lemon zest or fresh herbs once cooled for a fresh contrast. The zest brightens the smoky notes, and herbs add a surprising freshness.
- Cooking spray: If you want a mess-free roast, a quick spritz can help prevent sticking and promote even browning. Just a light spray; almonds can burn quickly if over-oiled.
Spotlight on key ingredients
Raw almonds:
- I love their natural aroma before roasting. Soaked first, they develop a deeper, oozier nuttiness that’s almost smoky.
- Salt: I prefer flaky sea salt because it melts nicely and enhances the almonds’ smoky depth with a crisp crunch.
Salt:
- I prefer flaky sea salt because it melts nicely and enhances the almonds’ smoky depth with a crisp crunch.
- Oil (optional): A tiny drizzle helps distribute heat evenly and adds a glossy, crunchy finish. Without it, almonds still roast well but less shiny.
Notes for ingredient swaps
- Dairy-Free: Skip butter or dairy-based oils; use a neutral plant oil like grapeseed or avocado for crispness and flavor.
- Sweeteners: Honey or maple syrup can replace sugar for a sticky, sweet glaze—just watch for burning during roasting.
- Salt Alternatives: Sea salt is my go-to, but flaky finishing salt offers a crunchier, more pronounced saltiness.
- Flavor Boosters: Smoked paprika or chili powder add smoky or spicy notes—use sparingly to not overpower the almonds.
- Oil Options: Coconut oil adds a subtle sweetness and aroma; if you prefer no oil, simply roast dry for a more intense nutty flavor.
- Herb Zests: Lemon or orange zest brightens the nuts with citrusy freshness—try herbs like thyme or rosemary for savory twists.
- Crunch Enhancers: Raw sugar or muscovado can be sprinkled during roasting for an extra caramelized crunch—use minimally.
Equipment & Tools
- Baking sheet with edges: To hold almonds and catch any stray bits during roasting.
- Mixing spoon or spatula: To stir almonds halfway through roasting for even color.
- Cooling rack (optional): To cool almonds evenly and prevent steam from softening the surface.
Step-by-step roasting almonds
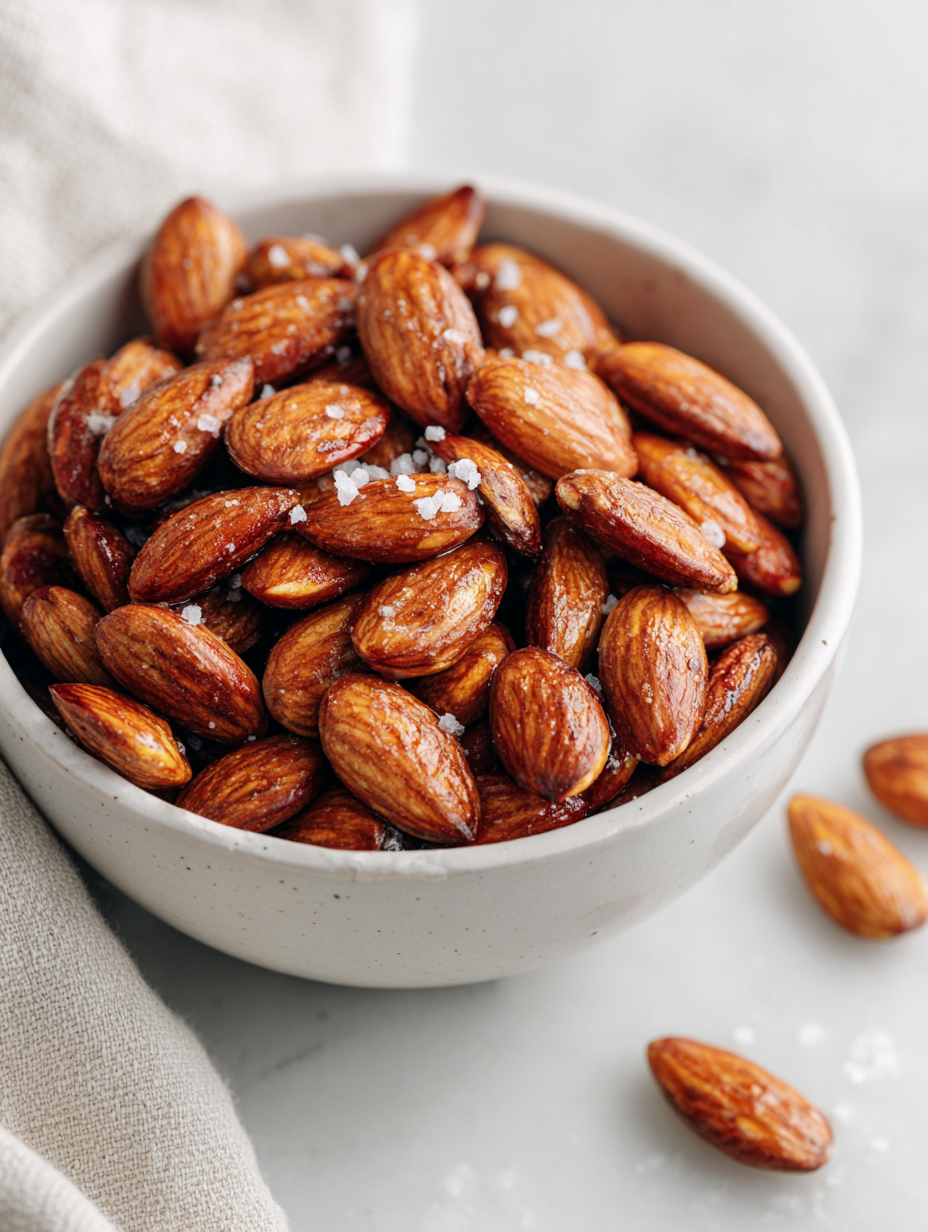
- Preheat your oven to 180°C (356°F). Use a baking sheet with edges to catch any stray almonds.
- Spread raw almonds in a single layer. If you like, toss with a tiny drizzle of neutral oil and a pinch of flaky sea salt for even roasting and flavor enhancement.
- Place the tray in the oven. Roast for about 10-12 minutes, stirring once halfway through. Keep a close eye; almonds can go from perfect to burnt quickly.
- Watch for a deep golden-brown color and smell that warm, nutty aroma. The almonds should crackle slightly as they toast.
- Remove from oven. If you added oil or salt, give them a gentle shake or stir to distribute evenly while still warm.
- Let the almonds rest on the tray for 5 minutes. They’ll continue to crisp as they cool. Avoid stacking or covering immediately to prevent steam buildup.
- Taste-test a few—if they’re oozing with flavor, slightly smoky, and crunchy, they’re ready to enjoy or cool completely for storage.
Allow almonds to cool completely on a rack or tray. Once cooled, transfer to an airtight container. They can be stored at room temperature for up to two weeks or frozen for longer keeping. For the best crunch, enjoy within the first week.
How to Know It’s Done
- Almonds are golden and fragrant, not dark and burnt.
- Crackle sound indicates proper toasting.
- They feel firm and crunchy when cooled.
Roasted Almonds
Ingredients
Equipment
Method
- Preheat your oven to 180°C (356°F) and line a baking sheet with edges to contain any stray almonds.
- Spread the raw almonds in a single, even layer on the baking sheet. Drizzle with a tiny bit of neutral oil and sprinkle with salt if using, then toss gently to coat evenly—this helps promote uniform browning and flavor.
- Place the baking sheet in the oven and roast for about 10 to 12 minutes. Stir the almonds halfway through to ensure even browning and prevent sticking. As they roast, you’ll notice a warm, nutty aroma filling the kitchen and almonds turning a beautiful golden-brown.
- Watch closely as the almonds develop a deep golden hue and crackle slightly—the crackling sound is a sign they’re toasted to perfection. Remove from the oven once they smell rich and toasted, but before they darken too much or burn.
- Let the almonds rest on the baking sheet for 5 minutes to cool slightly and finish crisping up. If you added oil and salt, gently toss again to distribute evenly while still warm.
- Transfer the cooled almonds to a bowl or plate. They should be fragrant, crunchy, and beautifully toasted with a rustic, golden appearance. Enjoy them as a snack, or sprinkle over salads and desserts for added flavor and texture.
Notes
Tips for Perfect Roasted Almonds
- Bolded Mini-Head: Use a heavy-bottomed skillet for even heat distribution, which helps prevent hot spots and scorching.
- Bolded Mini-Head: Keep almonds in a single layer; overcrowding causes uneven roasting and soggy bits.
- Bolded Mini-Head: Listen for a consistent crackle—this indicates the almonds are toasted perfectly, not burnt.
- Bolded Mini-Head: Toss almonds halfway through roasting to promote even browning and prevent sticking.
- Bolded Mini-Head: For extra crunch, let almonds cool completely on a wire rack to avoid steam-softening.
- Bolded Mini-Head: If almonds start to darken too quickly, lower the oven temperature by 10°C (20°F) and stir more frequently.
- Bolded Mini-Head: Use a pinch of salt after roasting; it sticks better when almonds are still warm and enhances flavor.
Common roasting mistakes and how to fix them
- FORGOT to monitor oven temperature → Always preheat and verify with an oven thermometer.
- DUMPED almonds on pan unevenly → Spread almonds in a single, even layer for uniform roasting.
- OVER-TORCHED almonds → Remove early if they turn dark or smell burnt.
- MISSED stirring halfway → Stir at 5-minute mark to prevent burning and ensure even color.
Quick fixes and pantry swaps
- When almonds burn quickly, splash with a little water to cool and slow the process.
- If almonds stick, patch with a light spray of oil and stir gently to prevent burning.
- Splash vinegar or lemon juice if almonds taste flat—adds brightness and cuts through smokiness.
- DUMPED almonds too close together? Spread them out and roast in smaller batches for even color.
- When in doubt, swap white sugar for raw sugar—adds rustic shimmer and deeper caramel notes.
Prep, store, and reheat tips
- Prepare roasted almonds up to a week in advance; store in an airtight container at room temperature, where they’ll stay crispy and fragrant.
- For longer storage, keep almonds in the fridge or freezer—up to a month—where they retain their smoky crunch without losing flavor.
- Reheat by spreading almonds on a baking sheet and warming at 150°C (300°F) for 5 minutes; they’ll shimmer with renewed crunch and aroma.
- To keep flavor fresh, store almonds away from humidity and strong odors; avoid stacking heavy items on top which can crush them.
- Cooling almonds thoroughly before storing prevents moisture buildup, ensuring they remain dry and crispy over time.
Top questions about roasted almonds
1. How do I know when roasted almonds are done?
Look for almonds that are fragrant and slightly oozing with a warm, nutty aroma. They should be evenly golden, not dark or burnt.
2. What if my almonds burn quickly?
If they smell smoky or look dark and charred, they’re overdone. Remove them immediately and cool to stop cooking.
3. How long can I keep roasted almonds?
Store roasted almonds in an airtight container at room temperature. They stay crispy for about a week, longer if refrigerated or frozen.
4. Can I flavor roasted almonds?
Yes, you can add a pinch of sea salt, smoked paprika, or a drizzle of honey before roasting for extra flavor layers.
5. What equipment do I need?
Use a heavy-bottomed baking sheet for even heat. Stir almonds halfway through roasting for uniform color and flavor.
6. How do I prevent uneven roasting?
Avoid overcrowding almonds on the pan; spread them in a single layer for even toasting and crunch.
7. What if almonds stick or burn?
If almonds stick or burn, lower the oven temperature slightly, stir more often, or add a light spray of oil to prevent sticking.
8. How do I reheat roasted almonds?
Reheat roasted almonds in a 150°C (300°F) oven for 5 minutes to revive crunch and aroma. Cool before storing.
9. Can I soak almonds before roasting?
Experiment with soaking almonds in water for 30 minutes before roasting, which can deepen flavor and improve crunch.
10. Can I use other nuts?
Yes, you can substitute other nuts like cashews or pecans, but roasting times and flavors will vary slightly.
Roasted almonds have a way of anchoring me back to simple pleasures—those warm, smoky bites remind me of lazy afternoons and good, honest snacks. There’s a quiet satisfaction in transforming raw nuts into something deeply flavored, almost nostalgic in its rustic charm.
In a world obsessed with fancy ingredients, this humble method keeps me grounded. Each batch feels like a small victory, a reminder that the best flavors often come from straightforward, unpolished techniques. It’s a little ritual I keep coming back to, especially when I want a snack that’s honest and satisfying.

Hi, I’m Lily Hayes, the cook, writer, and heart behind Loving This Process. This blog is built on a simple idea that food is not just about the final dish, but about everything that happens while you’re making it. The thinking, the tasting, the adjusting, the learning, and the quiet moments in between. Food has been a constant presence in my life, not as something flashy or perfect, but as something deeply grounding. Cooking has always felt like a process worth savoring, even when it’s messy, slow, or imperfect.


Leave a Reply