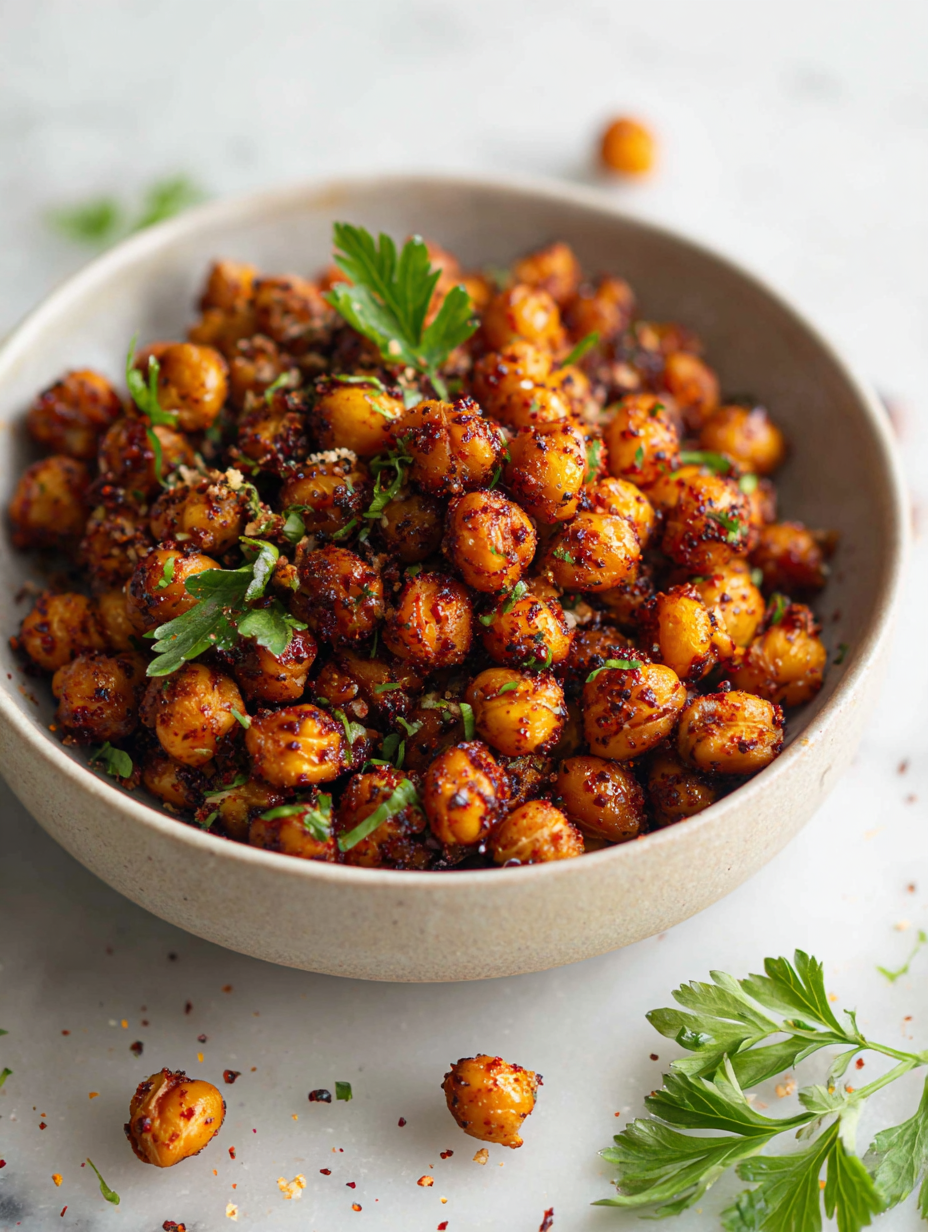
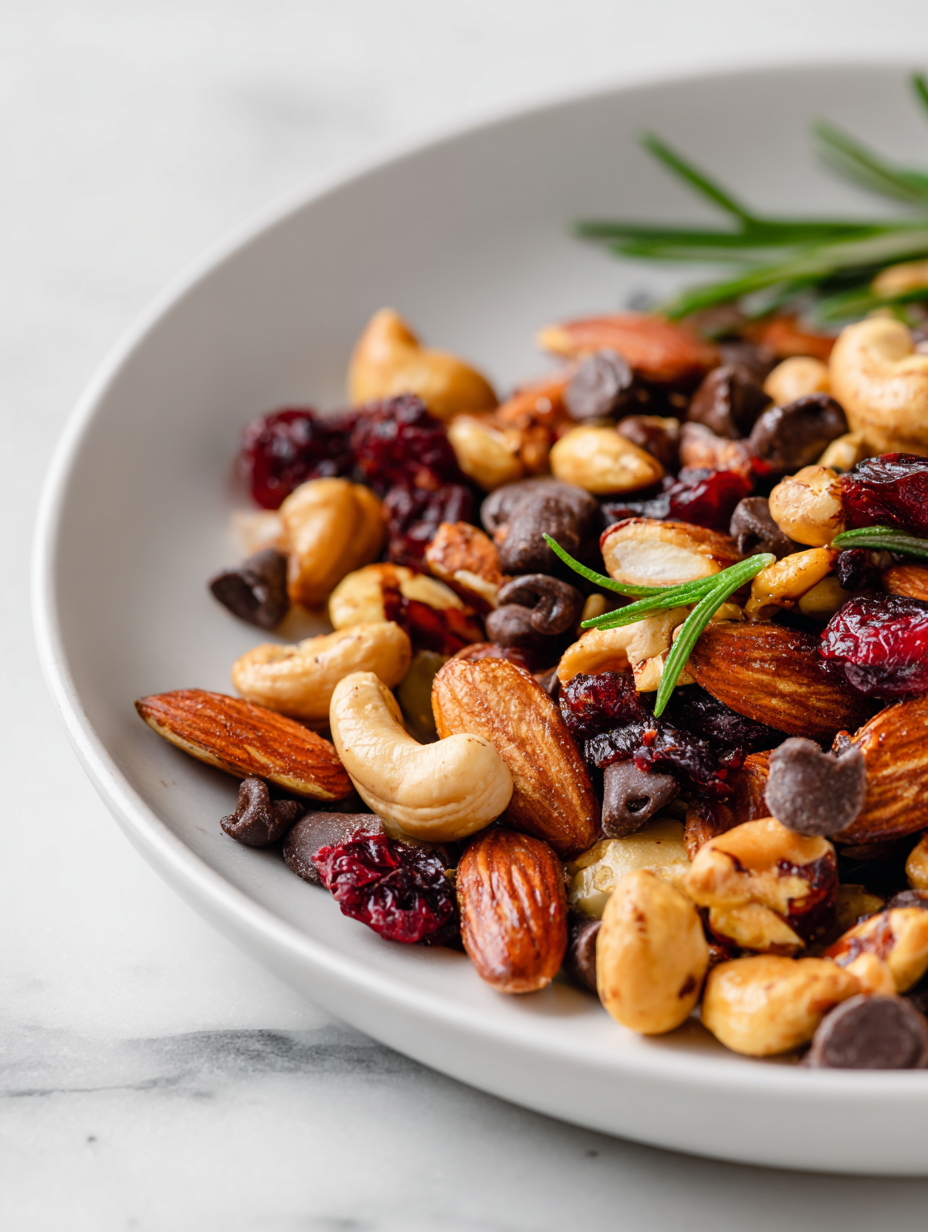
Roasted chickpeas are my go-to for a snack that feels both satisfying and easy to toss together. But I’ve recently started experimenting with sumac, that tangy, lemony spice I keep in my pantry, to give them a fresh, unexpected punch. It’s like giving a familiar favorite a bright new twist, especially when you’re craving something crunchy but not fried.
There’s something about the process that feels almost meditative—spreading out those chickpeas, watching them turn golden and crackly in the oven, smelling that toasty aroma. And when you sprinkle the sumac on hot from the oven, it blooms with a tartness that keeps you coming back for just one more handful. It’s a snack that’s simple, but the flavors surprise you every time.
Focusing on a single, overlooked spice—sumac—brings a tangy, lemony brightness that elevates a humble snack into something unexpectedly vibrant.
The story behind this recipe
- This recipe started from a moment of craving something crunchy and savory, but with a twist I could tweak easily. I remember one afternoon, rummaging through my pantry and spotting a jar of sumac—that tangy, lemony spice I rarely use enough. Tossing chickpeas with it and roasting until golden was a happy accident, turning a simple snack into something unexpectedly bright and addictive.
- There’s a quiet joy in turning humble ingredients into something memorable—no fancy equipment, just a little patience. The way the sumac blooms as the chickpeas roast, releasing that sharp aroma, makes me feel like I’ve unlocked a secret spice trick. It’s not just about snacking; it’s about capturing that perfect crunch and tang that lingers.
- heading: ‘The story behind this recipe’
Breakdown of Key Ingredients
- Olive oil: I like to toss the chickpeas in a splash of good olive oil—makes them extra crispy and shiny. Skip it if you’re oil-free, but expect a less golden finish.
- Canned chickpeas: I prefer cooked, drained chickpeas, but dry ones soaked and roasted work fine too. Just make sure they’re dry to avoid steaming instead of roasting.
- Sumac: This tangy spice is my secret weapon—brightens up every bite with a lemony punch. If you’re out, a squeeze of lemon zest can mimic that zing.
- Salt: I use flaky sea salt for a crunch that hits your teeth just right. Adjust to taste, especially if your chickpeas are already salty from the can.
- Optional spices: I sometimes toss in smoked paprika or cumin for deeper flavor. Keep it simple or go bold—your call, but don’t skip the salt and sumac.
- Sugar (a pinch): I add a tiny pinch to balance the tang with a whisper of sweetness—just enough to make the spices pop. Skip if you prefer savory only.
- Lemon zest (for finishing): I love to sprinkle fresh lemon zest after roasting—it adds a fresh, citrusy aroma that lifts the whole snack. Skip if you want pure spice.
Spotlight on key ingredients
Canned chickpeas:
- Chickpeas: I like them dry and firm, with a nutty aroma that intensifies when roasting. They crackle and turn golden, becoming irresistibly crispy.
- Chickpeas: During roasting, they puff slightly and develop a toasty scent with hints of earthiness, a sign they’re perfect for snacking.
Sumac:
- This spice blooms beautifully when heated, releasing a tangy, lemony aroma that’s bright and sharp. It clings to the chickpeas with a subtle, oozy texture.
- When sprinkled on hot chickpeas, it releases a vibrant red hue and a citrus zing that keeps your taste buds alert with every crunch.
Notes for ingredient swaps
- Oil-Free: Use a splash of water or skip oil altogether for a lighter, less crispy snack, but expect a softer texture.
- Canned Chickpeas: Swap with cooked dry chickpeas, just ensure they’re thoroughly dried before roasting to avoid steaming.
- Sumac: Out of sumac? A squeeze of lemon juice or a dash of lemon zest can mimic that bright, tangy punch.
- Salt: Use sea salt flakes for crunch and flavor; if avoiding salt, try a splash of soy sauce or tamari for umami.
- Spice Variations: Replace sumac with smoked paprika or cumin for a deeper, smoky flavor that still complements the crunch.
- Sweet Touch: Add a tiny pinch of sugar or honey before roasting for a caramelized, slightly sweet crunch.
- Lemon Zest: For a fresh finish, sprinkle chopped fresh herbs like parsley or cilantro instead of lemon zest.
Equipment & Tools
- Oven: To roast the chickpeas evenly
- Baking sheet: To hold the chickpeas during roasting
- Parchment paper or silicone mat: To prevent sticking and make cleanup easier
- Mixing bowl: To toss chickpeas with oil and spices
- Measuring spoons: To measure spices and oil
- Kitchen towel: To dry chickpeas thoroughly
- Lemon zester or microplane: To add fresh lemon zest as finishing touch
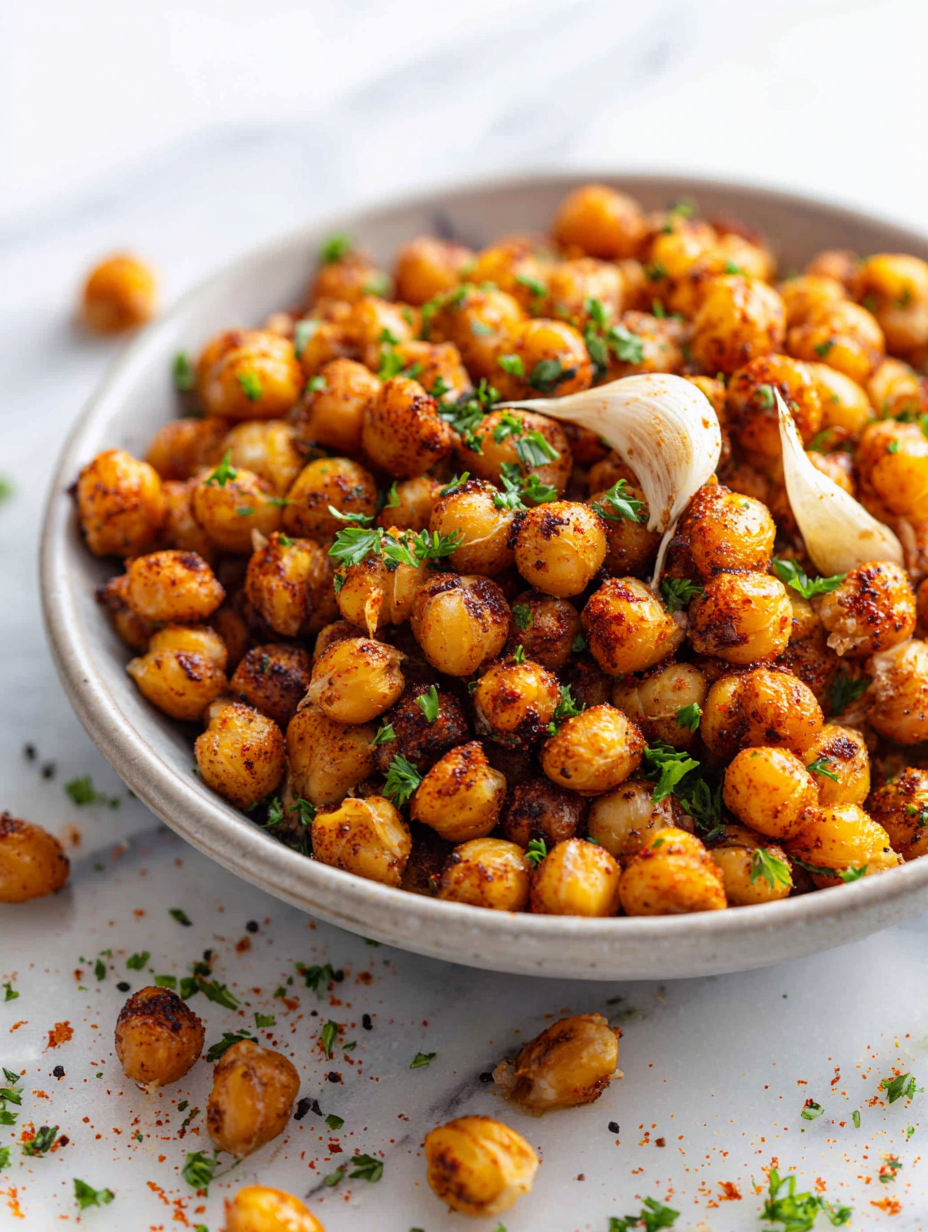
Step-by-step guide to roasting chickpeas
- Preheat your oven to 200°C (400°F). Line a baking sheet with parchment paper or a silicone mat for easy cleanup.
- Drain and rinse the canned chickpeas thoroughly. Spread them out on a clean kitchen towel and pat dry. Dryness is key for crunch.
- In a mixing bowl, toss the chickpeas with 1-2 tablespoons of olive oil until evenly coated. Add salt to taste.
- Sprinkle 1-2 teaspoons of sumac over the chickpeas. Toss again to distribute the spice evenly. Feel free to add a pinch of smoked paprika or cumin if you like a smoky depth.
- Spread the chickpeas in a single layer on the prepared baking sheet. Roast in the oven for 25-30 minutes.
- Halfway through (at 15 minutes), give the sheet a shake or stir the chickpeas to ensure even roasting. Keep an eye on them to prevent burning.
- Check for doneness: they should be golden, crispy, and crackling when you shake the sheet. The smell should be nutty and toasty.
- Remove from the oven. Let the chickpeas sit for 5 minutes to firm up. They will crisp further as they cool.
- Transfer to a bowl. For an extra bright finish, sprinkle with freshly grated lemon zest or a squeeze of lemon juice. Toss gently.
- Serve immediately or store in an airtight container. These reheat well in a 180°C (355°F) oven for 5-7 minutes, until crispy again.
Let the roasted chickpeas cool slightly on the tray for 5 minutes. Transfer to a bowl, sprinkle with lemon zest or a squeeze of lemon juice for brightness. Serve immediately for maximum crunch, or store in an airtight container for later snacking.
How to Know It’s Done
- Chickpeas are golden and crispy, with a slight crackle when shaken.
- They emit a toasted, nutty aroma with a hint of citrus from the sumac and lemon zest.
- The texture should be firm yet tender inside, with a crunchy exterior.
Sumac Roasted Chickpeas
Ingredients
Equipment
Method
- Preheat your oven to 200°C (400°F). Line a baking sheet with parchment paper or a silicone mat for easy cleanup.
- Drain and rinse the chickpeas thoroughly, then spread them out on a clean kitchen towel and pat dry until no moisture remains. This step helps achieve maximum crunch.
- Place the dried chickpeas in a mixing bowl and toss with a tablespoon of olive oil until evenly coated. This will give them a shiny, crispy exterior.
- Sprinkle the sumac evenly over the chickpeas, then add the sea salt and any optional spices like smoked paprika or cumin. Toss again to distribute the seasonings thoroughly.
- Spread the seasoned chickpeas in a single layer on the prepared baking sheet, ensuring they aren’t overlapping. This promotes even roasting.
- Roast the chickpeas in the oven for 25 to 30 minutes, shaking the pan halfway through to promote even crisping. Keep an eye on them as they turn golden and develop a crackly texture.
- Once golden and crispy, remove the baking sheet from the oven and let the chickpeas sit for 5 minutes—they will become even crunchier as they cool.
- Transfer the chickpeas to a bowl and sprinkle with freshly grated lemon zest for a bright, citrusy aroma that complements the tangy sumac.
- Gently toss to distribute the lemon zest evenly, then serve immediately for the best crunch or store in an airtight container for later snacking.
Notes
Tips and tricks for perfect roasted chickpeas
- Bolded mini-head: Ensure chickpeas are completely dry before tossing with oil—this guarantees maximum crunch and avoids steaming.
- Bolded mini-head: Toss chickpeas with oil and spices while still warm from the oven—this helps the seasoning stick better.
- Bolded mini-head: Shake the baking sheet halfway through roasting—uniform color and crispness depend on even heat exposure.
- Bolded mini-head: Keep an eye on the chickpeas during the last 5 minutes—remove once they turn a deep golden to prevent over-torching.
- Bolded mini-head: Let the chickpeas rest for 5 minutes after roasting—this allows the exterior to crisp up further for perfect texture.
- Bolded mini-head: For an extra flavor boost, sprinkle lemon zest immediately after roasting—this preserves its bright aroma and tang.
- Bolded mini-head: Store cooled chickpeas in an airtight container—reheat in a 180°C (355°F) oven until crackling again, about 5 minutes.
Common mistakes and how to fix them
- FORGOT to dry chickpeas thoroughly → Ensure they’re completely dry for maximum crunch.
- DUMPED too much oil → Use just enough to coat evenly, avoiding greasy snacks.
- OVER-TORCHED chickpeas → Roast until golden, not burnt; shake halfway for even color.
- MISSED seasoning at the end → Add lemon zest or herbs immediately after roasting for fresh flavor.
Quick fixes for roasted chickpeas
- If chickpeas are soggy, splash them with a little more oil and roast a few minutes longer.
- When spices burn, reduce oven temperature slightly and stir the chickpeas halfway through.
- Splash with lemon juice if sumac feels dull after roasting—brightens the flavor instantly.
- Patch over uneven roasting by flipping chickpeas more frequently during baking.
- Shield chickpeas from overcrowding—use a larger sheet or avoid stacking to ensure crisping.
Prep, store, and reheat tips
- Prepare chickpeas and spice mixture a day ahead; store separately to maintain crispness.
- Keep roasted chickpeas in an airtight container at room temperature for up to 3 days, maintaining crunch and flavor.
- For longer storage, refrigerate up to 1 week; reheating in a 180°C (355°F) oven for 5-7 minutes restores crispness.
- Reheated chickpeas might lose some crunch but will still deliver a satisfying snack with a slightly softer texture.
- Avoid moisture exposure—keep away from humidity to prevent sogginess and preserve that fresh, crispy bite.
FAQs about Roasted Chickpea Snack
1. How do I know when the chickpeas are crispy enough?
Aim for chickpeas that are dry and puffy; the texture should be crisp and crackly when done. If they’re soggy, they won’t crunch properly.
2. What’s the best way to tell if they’re done?
Roast until they’re golden brown, smell nutty and toasty, and shake the pan to hear a crackling sound. They should feel firm inside.
3. Can I skip the oil? Will they still crunch?
Yes, a light spray of oil helps them crisp up. Use just enough to coat evenly—too much can make them greasy.
4. What can I use instead of sumac?
Sumac adds a tangy, lemony brightness. If you don’t have it, a squeeze of lemon juice or lemon zest works well as a substitute.
5. How should I store leftovers and reheat them?
Store cooled chickpeas in an airtight container at room temp for up to 3 days. Reheat in the oven at 180°C (355°F) for 5–7 minutes until crisp again.
6. What if my chickpeas aren’t crispy or are burnt?
If they turn out too soft, spread them out more on the baking sheet and roast a few extra minutes. For burnt spots, lower the temperature slightly.
7. How do I prevent soggy chickpeas?
Use a large baking sheet to avoid overcrowding. Overcrowding causes uneven roasting and sogginess. Shake the pan at least once during baking.
8. Can I customize the spices?
Adding a pinch of sugar balances the tang of sumac. You can also toss in smoked paprika or cumin for more depth.
9. Can I use dried chickpeas instead of canned?
Dried chickpeas from dry beans can work, but make sure they’re fully cooked and dried before roasting to avoid steaming.
10. What finishing touches enhance the flavor?
Yes, adding lemon zest or fresh herbs after roasting boosts flavor. Just sprinkle on while the chickpeas are still warm for best adhesion.
This snack feels like a quiet victory—simple ingredients, a bit of spice, and that warm oven aroma. It’s surprisingly satisfying to turn humble chickpeas into something with a satisfying crunch and a bright burst of tang. Sometimes, the little things like this make the day just a bit more flavorful.
And honestly, once you get the hang of roasting chickpeas just right, it’s hard to go back to store-bought. Plus, they’re perfect for tossing into salads or packing for a quick, crunchy bite on the go. No matter how often I make these, they always remind me that good snacks are just a few pantry staples away.

Hi, I’m Lily Hayes, the cook, writer, and heart behind Loving This Process. This blog is built on a simple idea that food is not just about the final dish, but about everything that happens while you’re making it. The thinking, the tasting, the adjusting, the learning, and the quiet moments in between. Food has been a constant presence in my life, not as something flashy or perfect, but as something deeply grounding. Cooking has always felt like a process worth savoring, even when it’s messy, slow, or imperfect.


Leave a Reply