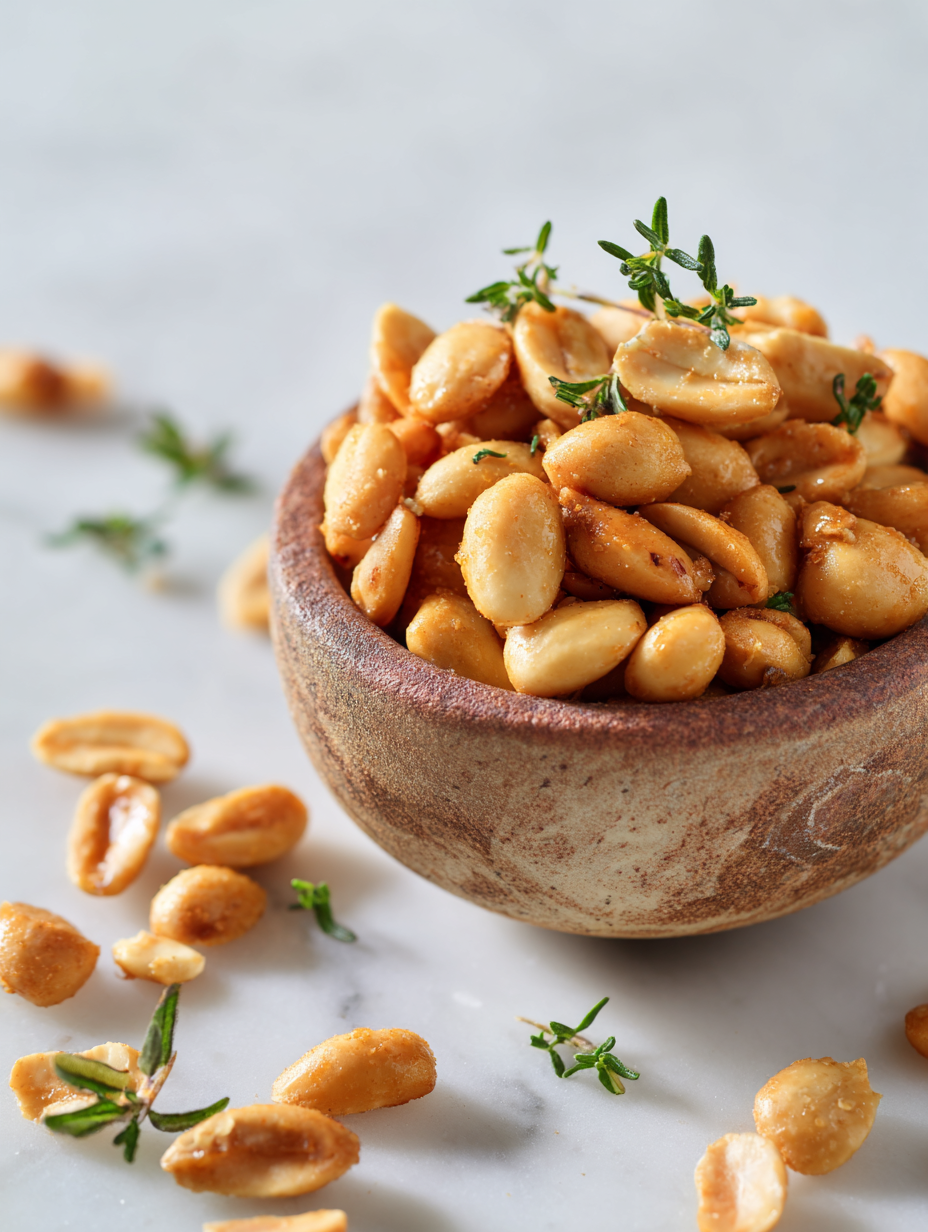
There’s something about the humble peanut that often gets overlooked. When roasted right, they reveal a warm, nutty aroma that fills the kitchen, evoking memories of childhood snacks and simple pleasures. This recipe is less about precision and more about embracing the chaos—listening for that perfect crackle and catching the scent of toasted goodness just before they turn too dark.
Making roasted peanuts at home isn’t just about saving a few bucks; it’s about reclaiming that satisfying crunch and smoky aroma that store-bought versions often miss. I’ve found that a little patience and a watchful eye turn everyday peanuts into a snack that feels like a small, honest victory. It’s a ritual that turns a simple ingredient into something truly satisfying, with a nostalgic punch that’s hard to beat.
Focusing on the overlooked beauty of simple, homemade roasted peanuts—highlighting their aroma, crunch, and nostalgic appeal—crafted with honest, unpolished notes that feel like a cook’s secret shared over the counter.
The story behind this recipe
- I remember the first time I roasted peanuts in my tiny apartment kitchen. The smell was so unexpectedly rich and inviting, it made me pause right there, mid-cleanup. From that moment, I started experimenting, trying to capture that perfect balance of smoky aroma and crunch. It’s one of those small kitchen victories that feels like reclaiming a childhood memory, but with a more grown-up, roasted edge.
- This recipe isn’t just about flavor; it’s about the quiet joy of turning a simple ingredient into something more soulful. I’ve watched friends take one bite and get transported—those familiar, nostalgic notes hit just right. It’s the kind of snack that feels like a secret shared over a busy stove, a little act of mindful indulgence that never gets old.
- heading: The story behind this recipe
Key ingredients and tips
- Raw peanuts: I prefer using unsalted, raw peanuts for the purest flavor. Skip the roasted ones—they’re already cooked and won’t crisp up the same.
- Salt: I sprinkle a generous pinch of flaky sea salt after roasting. It enhances the nutty aroma and gives that satisfying salty crunch—don’t skip this step.
- Oil (optional): A light drizzle of neutral oil like grapeseed can help achieve an even, golden roast. Otherwise, the dry heat alone works fine if you prefer a cleaner flavor.
- Sugar (optional): A tiny pinch of sugar tossed before roasting can add a subtle caramel note, but be careful not to burn it—keep an eye on the color.
- Spices (optional): A dash of smoked paprika or cayenne can turn this simple snack into something bolder. Mix in before roasting for an even coat and smoky punch.
- Cooling rack: I use a wire rack to cool the peanuts—this prevents them from steaming and keeps that crunch intact. Trust me, don’t skip this step.
- Baking sheet: A rimmed sheet lined with parchment helps contain the nuts and makes cleanup easier, especially if you add oil or spices.
Spotlight on key ingredients
Peanuts:
- Raw peanuts: I prefer using unsalted, raw peanuts for the purest flavor. Skip the roasted ones—they’re already cooked and won’t crisp up the same.
- Salt: I sprinkle a generous pinch of flaky sea salt after roasting. It enhances the nutty aroma and gives that satisfying salty crunch—don’t skip this step.
- Oil (optional): A light drizzle of neutral oil like grapeseed can help achieve an even, golden roast. Otherwise, the dry heat alone works fine if you prefer a cleaner flavor.
Salt & Spices:
- Salt: I prefer flaky sea salt for its crunch and clean flavor. It balances the earthy nuttiness and enhances aroma.
- Spices (optional): Smoked paprika or cayenne can add smoky warmth or heat. Toss in before roasting for even coating and bold flavor.
Notes for ingredient swaps
- Dairy-Free: Skip butter or any dairy; just use oil. Keeps the flavor pure and nutty, without creamy notes.
- Salt Variations: Use Himalayan pink salt or flavored salts for a different mineral punch or extra aroma.
- Sweeteners: Honey or maple syrup can be drizzled before roasting for a caramelized finish—expect a sweeter, stickier snack.
- Spice Alternatives: Cayenne, chili powder, or curry powder can replace smoked paprika for more heat or complex spice notes.
- Oil Choice: Swap neutral oil with coconut oil for a subtle sweetness and a hint of tropical aroma, but watch the heat as it smokes faster.
- Peanut Type: Use dry-roasted peanuts if you prefer less raw flavor, but they’ll toast differently—less moisture, more crunch.
- Add-ins: Toss in dried herbs or garlic powder after roasting for an aromatic twist—just sprinkle and toss briefly.
Equipment & Tools
- Oven: To roast the peanuts evenly at consistent temperature.
- Baking sheet: To hold the peanuts in a single layer for even roasting.
- Parchment paper or silicone mat: To prevent sticking and facilitate easy cleanup.
- Cooling rack: To cool the peanuts without steaming, keeping them crispy.
- Spatula or spoon: To stir or shake the peanuts halfway through roasting.
Step-by-step roasting guide
- Preheat your oven to 180°C (350°F). Line a baking sheet with parchment paper or a silicone mat—no sticking, no fuss.
- Measure out your raw peanuts—about 2 cups. No need to wash, just pick out any broken or discolored ones.
- If using oil, lightly toss the peanuts in 1 teaspoon of neutral oil—grapeseed or canola—just enough to coat them evenly. Skip if you want a drier roast.
- Spread the peanuts in an even layer on the prepared baking sheet. Make sure they’re not piled up—air needs to circulate.
- Slide into the oven. Roast for 15-20 minutes. Every 5 minutes, give the sheet a shake or stir to ensure even browning.
- Watch for color: they should turn a warm, golden brown, with a rich, nutty aroma filling the kitchen. The smell might be faint at first but will intensify.
- Around 15 minutes, start checking more frequently. Peanuts are done when they’re deeply toasted but not burnt. They’ll crackle when stirred—listen for that satisfying snap.
- Remove from oven. Let them rest on the baking sheet for 5 minutes—the residual heat will deepen the flavor and finish crisping the skin.
- Transfer to a cooling rack. Spread them out so they don’t steam and lose their crunch. Let cool completely before handling.
- Once cooled, sprinkle with flaky sea salt if desired, and toss gently to distribute. They’re ready to snack or use in recipes.
Let the peanuts rest on the rack for 5 minutes to deepen flavor and ensure crispness. Finish with a sprinkle of sea salt if desired, then store in an airtight container once completely cooled.
How to Know It’s Done
- Peanuts are evenly toasted with a deep golden hue.
- A warm, nutty aroma fills the kitchen, indicating doneness.
- They crackle when stirred and have a firm, crispy texture.
Homemade Roasted Peanuts
Ingredients
Equipment
Method
- Preheat your oven to 180°C (350°F). Line a rimmed baking sheet with parchment paper or a silicone mat for easy cleanup.
- Measure out two cups of raw, unsalted peanuts and spread them evenly across the prepared baking sheet, creating a single layer for even roasting.
- If you like, lightly toss the peanuts with a teaspoon of neutral oil to help achieve a more uniform, golden color. Spread the coated or plain peanuts back into an even layer.
- Place the baking sheet in the oven and roast for 15 to 20 minutes. Every 5 minutes, gently shake or stir the peanuts to promote even browning and prevent hot spots.
- Watch closely as the peanuts turn a deep golden brown and fill your kitchen with a warm, nutty aroma. They may crackle slightly as they toast—listen for that satisfying sound.
- Once they reach your desired color and aroma, remove the baking sheet from the oven and let the peanuts rest on the tray for about 5 minutes—this allows them to settle and deepen their flavor.
- Transfer the peanuts to a wire cooling rack to cool completely, ensuring they stay crispy and don’t steam. Sprinkle a pinch of flaky sea salt over the warm nuts for added flavor, then toss gently to distribute evenly.
- Once fully cooled, enjoy these homemade roasted peanuts as a snack or incorporate them into other dishes for added crunch and flavor.
Notes
Pro tips for perfect roasted peanuts
- Bolded mini-head: Use a light hand with oil—just enough to coat for even browning and crispness.
- Bolded mini-head: Shake the pan halfway through roasting—this ensures uniform color and prevents hot spots.
- Bolded mini-head: Keep an eye on color—peanuts go from golden to burnt quickly after 15 minutes.
- Bolded mini-head: Listen for crackling sounds—this is a good sign they’re releasing their nutty aroma and crisping up.
- Bolded mini-head: Cool on a wire rack immediately after roasting—this stops residual heat and maintains crunch.
- Bolded mini-head: For extra flavor, sprinkle salt right after cooling—hot nuts absorb seasoning better.
- Bolded mini-head: Store in an airtight container once fully cooled—keeps them fresh and crunchy for days.
Common mistakes and how to fix them
- FORGOT to watch peanuts during roasting → Check color and aroma frequently.
- DUMPED hot peanuts into a container immediately → Cool on a rack before storing.
- OVER-TORCHED peanuts → Reduce oven temperature or roasting time.
- SKIPPED seasoning step → Add salt or spices after roasting for best flavor.
Quick fixes and pantry swaps
- When nuts are unevenly toasted, stir and rotate the pan to promote even color.
- If peanuts are too dark or burnt, lower oven temperature and extend roasting time.
- Splash a few drops of water if peanuts start to smoke excessively—cooling the pan helps.
- Patch a dull flavor by sprinkling fresh salt or spices after roasting—don’t skip this step.
- Shield over-browned nuts with foil if they brown too quickly—monitor closely for perfect crunch.
Prep, store, and reheat tips
- Peanuts can be roasted a day ahead; keep in an airtight container at room temperature. The aroma intensifies overnight.
- Store cooled roasted peanuts in an airtight jar or container for up to two weeks. They remain crunchy and fragrant, with a rich, toasted scent.
- Reheat by gently warming in a dry skillet over low heat for 2-3 minutes, listening for a slight crackle as they warm. Avoid overheating to prevent oil separation or burning.
- For longer storage, freeze roasted peanuts in a sealed bag for up to a month. Thaw at room temperature, then rewarm briefly if desired, until fragrant and crispy.
Top questions about roasted peanuts
1. How do I pick the best peanuts for roasting?
Look for peanuts with a uniform, rich golden color and a deep nutty aroma. They should feel firm and dry, not greasy or dull.
2. When are peanuts done roasting?
To achieve that perfect crunch, roast peanuts until they are deeply golden and smell toasted but not burnt, usually around 15-20 minutes.
3. How long do roasted peanuts stay fresh?
Store roasted peanuts in an airtight container at room temperature for up to two weeks, ensuring they stay crispy and fragrant.
4. Can I use oil when roasting peanuts?
Yes, lightly tossing with oil helps them toast more evenly and enhances their flavor, especially if you add spices or salt afterward.
5. Should I add salt before or after roasting?
If you prefer less salt, sprinkle a small pinch after roasting, or toss in spices before roasting for extra flavor.
6. Can I reheat roasted peanuts?
Roasted peanuts can be reheated briefly in a dry skillet over low heat, about 2-3 minutes, to restore crunch and aroma.
7. How do I prevent peanuts from burning during roasting?
To prevent burning, keep an eye on them after 15 minutes and shake the pan periodically for even color.
8. Why should I cool peanuts on a rack?
Use a wire rack to cool them immediately after roasting. This prevents steam buildup and keeps the crunch intact.
9. Can I freeze roasted peanuts?
Yes, you can freeze roasted peanuts in an airtight bag for up to a month. Thaw at room temperature for best texture.
10. How can I ensure even roasting?
Avoid opening the oven door too often, as fluctuations in temperature can cause uneven roasting and burnt spots.
Roasted peanuts might seem simple, but their warm aroma and crunchy texture make them unforgettable. Once you master this basic technique, you’ll find endless ways to enjoy them—snacking, adding to salads, or even blending into sauces.
Taking a moment to perfect the roast is a small ritual that reconnects us with honest, everyday ingredients. It’s a reminder that sometimes, the simplest snacks are the most satisfying, especially when filled with that smoky, nutty flavor you’ve crafted yourself.

Hi, I’m Lily Hayes, the cook, writer, and heart behind Loving This Process. This blog is built on a simple idea that food is not just about the final dish, but about everything that happens while you’re making it. The thinking, the tasting, the adjusting, the learning, and the quiet moments in between. Food has been a constant presence in my life, not as something flashy or perfect, but as something deeply grounding. Cooking has always felt like a process worth savoring, even when it’s messy, slow, or imperfect.


Leave a Reply