There’s something oddly meditative about slicing zucchini into thin rounds—each one feels like a tiny canvas, ready to become something crispy and satisfying. Turning these humble vegetables into baked chips is a slow, mindful process that rewards patience with crunch and flavor. It’s a ritual that makes snack time feel a little more intentional, a quiet moment to enjoy in the chaos of the day.
Baking zucchini chips at home isn’t just about the snack itself; it’s about reclaiming a moment in the kitchen. No greasy oil splatters, no deep-frying mess—just a simple, honest process that transforms a watery veggie into a crispy, golden treat. It’s a small act of kindness for your body and mind, a reminder that good snacks can be straightforward and satisfying without the fuss.
This recipe is perfect for those days when you crave something crunchy but want to keep it light and fresh. It’s a way to use up garden zucchinis, turn them into something snackable, and maybe even slow down long enough to enjoy the process. Plus, the aroma of baked zucchini turning golden is a quiet, inviting joy that fills the kitchen without any effort.
Focusing on how making crispy zucchini chips at home can be a satisfying, mindful ritual that turns a simple veggie into a crunchy snack, perfect for when you need a break from the usual chips or fries.
The story behind this recipe
- One summer, I was overwhelmed with zucchinis from my garden, all coming at once. I wanted to do something different, something that kept the veggie’s freshness intact. Crispy snacks seemed like the perfect solution—simple, satisfying, and a way to preserve the season’s bounty in a new form.
- I started experimenting with baking thin slices, trying to get that perfect crunch without the grease. The smell of roasted zucchini, a little smoky and sweet, became a sort of comfort. It’s funny—these chips remind me of childhood snacks, but with a grown-up twist of simplicity and wholesome flavor.
- Making these at home turned into a quiet ritual—something you do when you need a break, a moment of focus. No fuss, just a tray of sliced zucchini, a sprinkle of salt, and the oven doing its magic. That gentle crackle as they crisp up is oddly satisfying, a small reminder that good things often come from patience.
Key ingredients and tips
- Zucchini: I prefer using straight, firm zucchinis with tight skin—less watery, more crunch. Swap for yellow squash if you want a softer bite.
- Olive oil: A light brush of good-quality olive oil helps the chips crisp up and adds a mild fruity aroma. Skip or reduce if you want a oil-free version, but expect a different texture.
- Salt: I find a sprinkle of flaky sea salt on top enhances the natural sweetness of zucchini. You can use seasoned salt or garlic salt for extra flavor.
- Black pepper: A few cracks of freshly ground pepper add a subtle spicy note. Omit if you prefer a milder, more neutral snack.
- Paprika or chili powder: A dusting gives a smoky, warming kick that really makes the chips pop. Use smoked paprika for depth, or skip for milder taste.
- Parmesan (optional): I love a sprinkle of grated Parmesan before baking for a salty, cheesy crust. Vegan cheese can work if you’re avoiding dairy, but it won’t melt quite the same.
- Panko breadcrumbs (optional): For extra crunch, a light coating of panko can be added. Be gentle—too much can turn the chips soggy instead of crispy.
Spotlight on key ingredients
Zucchini:
- I prefer using straight, firm zucchinis with tight skin—less watery, more crunch. Swap for yellow squash if you want a softer bite.
- Olive oil: A light brush of good-quality olive oil helps the chips crisp up and adds a mild fruity aroma. Skip or reduce if you want a oil-free version, but expect a different texture.
- Salt: I find a sprinkle of flaky sea salt on top enhances the natural sweetness of zucchini. You can use seasoned salt or garlic salt for extra flavor.
Spices & Cheese:
- Paprika or chili powder: A dusting gives a smoky, warming kick that really makes the chips pop. Use smoked paprika for depth, or skip for milder taste.
- Parmesan (optional): I love a sprinkle of grated Parmesan before baking for a salty, cheesy crust. Vegan cheese can work if you’re avoiding dairy, but it won’t melt quite the same.
Notes for ingredient swaps
- Zucchini: I prefer firm, straight zucchinis with tight skin—less watery, more crunch. Swap for yellow squash if you want a softer bite.
- Olive oil: A light brush of good-quality olive oil helps the chips crisp up and adds a mild fruity aroma. Skip or reduce if you want an oil-free version, but expect a different texture.
- Salt: I find a sprinkle of flaky sea salt on top enhances the natural sweetness of zucchini. You can use seasoned salt or garlic salt for extra flavor.
- Black pepper: A few cracks of freshly ground pepper add a subtle spicy note. Omit if you prefer a milder, more neutral snack.
- Paprika or chili powder: A dusting gives a smoky, warming kick that really makes the chips pop. Use smoked paprika for depth, or skip for milder taste.
- Parmesan (optional): I love a sprinkle of grated Parmesan before baking for a salty, cheesy crust. Vegan cheese can work if you’re avoiding dairy, but it won’t melt quite the same.
- Panko breadcrumbs (optional): For extra crunch, a light coating of panko can be added. Be gentle—too much can turn the chips soggy instead of crispy.
Equipment & Tools
- Mandoline or sharp knife: To slice zucchini evenly and thinly for uniform cooking.
- Baking sheet with parchment paper: To bake the chips evenly and prevent sticking.
- Pastry brush or spoon: To lightly coat slices with oil without overdoing it.
- Wire rack: To cool and crisp the chips post-baking.
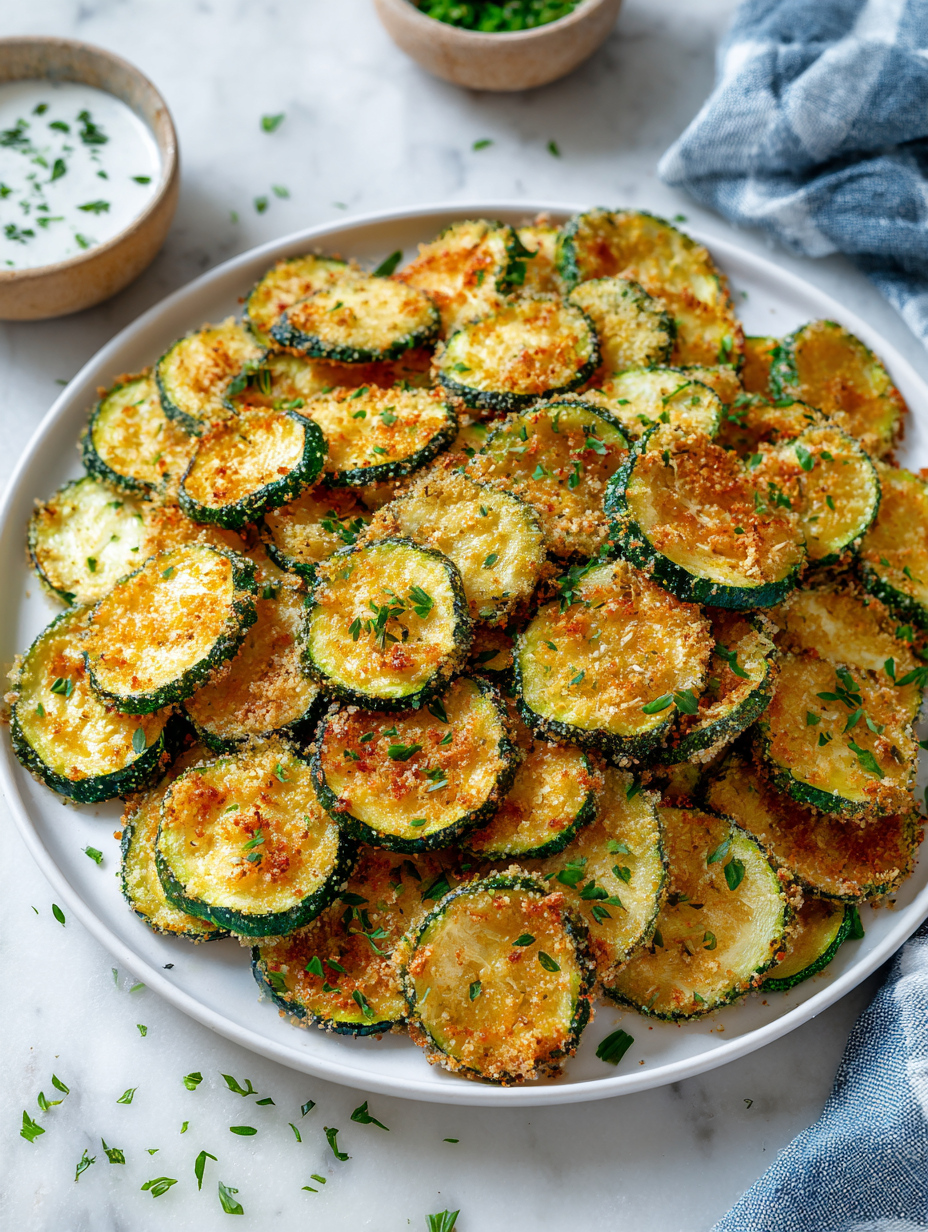
Step-by-step to crispy zucchini chips
- Preheat your oven to 200°C (390°F). Line a baking sheet with parchment paper for easy cleanup.
- Wash the zucchini thoroughly. Slice into thin rounds, about 2-3 mm thick, using a sharp mandoline or a steady hand with a knife.
- In a small bowl, mix 1-2 tablespoons olive oil with a pinch of salt and optional spices like smoked paprika or black pepper.
- Brush each zucchini slice lightly with the oil mixture, ensuring an even coat without drenching them. Place slices in a single layer on the prepared baking sheet.
- Bake for 15-20 minutes. Keep an eye on the chips after 12 minutes; they can go from crispy to burnt quickly. Flip them halfway through for even crispness.
- Check for doneness: the edges should be golden and crispy, and the chips should feel firm to the touch. If they’re still soft, bake a few more minutes, but watch closely to avoid over-browning.
- Once baked, remove from the oven and let sit for 2-3 minutes on the sheet. They will continue to crisp as they cool.
- Transfer to a wire rack or plate to cool completely. For maximum crunch, let them rest 5-10 minutes before serving.
Let the chips rest on a wire rack for 5-10 minutes to maximize crispness. Serve immediately or store in an airtight container once fully cooled.
How to Know It’s Done
- Edges are golden and crispy, not pale or soggy.
- The chips crackle when you bite into them, indicating crunch.
- They feel firm but not brittle, with a slight bend without breaking.
Baked Crispy Zucchini Chips
Ingredients
Equipment
Method
- Preheat your oven to 200°C (390°F) and line a baking sheet with parchment paper to keep things tidy.
- Wash the zucchinis thoroughly, then slice them into thin, even rounds about 2-3 mm thick using a mandoline or a sharp knife. Aim for uniform slices so they cook evenly.
- In a small bowl, whisk together the olive oil, a pinch of flaky sea salt, and optional spices like smoked paprika and freshly ground black pepper.
- Using a pastry brush or the back of a spoon, lightly brush each zucchini slice on both sides with the seasoned olive oil mixture. Be gentle but thorough—this helps them crisp without becoming soggy.
- Arrange the coated zucchini slices in a single layer on the prepared baking sheet, making sure they don’t overlap. If using Parmesan, sprinkle it evenly over the slices now for a cheesy crust.
- Bake in the preheated oven for 15-20 minutes. Check around the 12-minute mark and flip the slices carefully with tongs or a spatula for even crispiness. Keep an eye on them so they don’t burn—edges should turn a deep golden brown.
- Once they are golden and crispy, remove the baking sheet from the oven and let the chips sit for a few minutes on the sheet. They will continue to crisp as they cool down.
- Transfer the chips to a wire rack to cool completely, which helps maintain their crunch. Serve immediately for the best texture, or store in an airtight container once cooled.
Pro tips for crispy zucchini chips
- Bolded Mini-Head: Thin slices matter → Use a mandoline or steady hand to get even, crispy edges.
- Bolded Mini-Head: Watch the oven closely → Chips can go from perfect to burnt in a minute after 15 minutes.
- Bolded Mini-Head: Flip halfway → Ensures uniform crispness and prevents uneven burning.
- Bolded Mini-Head: Light oil coat → Use a pastry brush to avoid soggy chips caused by excess oil.
- Bolded Mini-Head: Cool on a rack → Keeps excess moisture away, enhancing crunch when cooling.
- Bolded Mini-Head: Keep an eye on edges → They should turn a deep golden without turning dark or black.
- Bolded Mini-Head: Adjust baking time → If chips are soft, bake a few more minutes, but stay alert to avoid overdoing it.
Common mistakes and how to fix them
- FORGOT to pat zucchini dry → Include a quick towel blot to reduce moisture.
- DUMPED too much oil → Use a light brush to avoid soggy chips.
- OVER-TORCHED chips → Bake at lower temp or watch closely after 15 minutes.
- MISSED flipping slices → Turn halfway for even crispness.
Quick fixes and pantry swaps
- When chips are soggy, splash with a little more oil and bake a few minutes longer.
- If chips stick together, patch with a gentle shake during baking to separate slices.
- Over-baked chips? Ditch the burnt ones and shield the rest with foil for even baking.
- Dumped too much salt? Rinse briefly and dry zucchini slices to tone down the saltiness.
- When the oven crackles loudly, reduce heat slightly to prevent over-torching and keep the aroma inviting.
Prep, store, and reheat tips
- Pre-slice zucchini a day ahead; keep in an airtight container in the fridge to prevent moisture loss, which can make chips less crispy.
- Store baked chips in an airtight container at room temperature for up to 2 days. They’ll lose some crunch but stay tasty if kept dry.
- For longer storage, freeze cooled chips in a sealed bag for up to 1 month. Reheat in a 180°C (350°F) oven until crisp again, about 5-7 minutes, until you hear a crackle.
- Reheating chips will soften if not reheated properly. To restore crunch, bake at 180°C (350°F) for a few minutes, watching closely, until they shimmer with crispness.
Top questions about baked zucchini chips
1. How thin should I slice the zucchini?
Use a sharp mandoline or steady knife to slice zucchini into thin, even rounds. Thinner slices crisp better and cook evenly.
2. What’s the ideal baking temperature and time?
Bake at 200°C (390°F) for 15-20 minutes. Keep an eye after 12 minutes to prevent burning. Flip slices halfway for even crispness.
3. How do I know when the chips are done?
Look for edges that are golden and crispy, with a firm feel when you gently press. They should crackle when bitten.
4. Why did my chips burn so fast?
If the chips turn dark quickly, reduce oven temperature slightly or bake for a shorter time. Always watch after 15 minutes.
5. How should I store leftovers?
Store cooled chips in an airtight container at room temperature for up to 2 days. To re-crisp, reheat in a 180°C (350°F) oven for 5-7 minutes until shimmering with crunch.
6. Can I use other vegetables instead of zucchini?
Yes, you can swap zucchini for yellow squash or cucumber slices for a slightly softer or wetter chip, but expect different crunch levels.
7. Should I oil the zucchini slices before baking?
A light brush of olive oil helps them crisp up and adds aroma. Too much oil makes them soggy, so use just enough to coat each slice.
8. What spices work well with zucchini chips?
Adding spices like smoked paprika or chili powder boosts flavor. Use mild herbs or skip entirely for a simple, salty snack.
9. How do I get evenly crispy chips?
If you slice unevenly, some will be softer or overdone. Use a mandoline for uniform slices and consistent crispness.
10. What do I do if my chips turn out soggy or burnt?
When chips are soggy, increase oven temperature slightly or bake a few extra minutes. For burnt chips, reduce heat and watch closely.
Making these baked zucchini chips is a small act of rebellion against the typical snack routine. The aroma of baking zucchini, fragrant and smoky, fills the kitchen and reminds me how simple ingredients can become something unexpectedly addictive.
They’re perfect for grabbing when you need a quick crunch or a lighter option. Honestly, I keep coming back to this recipe, not just for the taste but because it’s a mindful, satisfying moment in my day that’s all about honest, straightforward cooking.

Hi, I’m Lily Hayes, the cook, writer, and heart behind Loving This Process. This blog is built on a simple idea that food is not just about the final dish, but about everything that happens while you’re making it. The thinking, the tasting, the adjusting, the learning, and the quiet moments in between. Food has been a constant presence in my life, not as something flashy or perfect, but as something deeply grounding. Cooking has always felt like a process worth savoring, even when it’s messy, slow, or imperfect.
Leave a Reply